Homemade Jos Louis Cake Is More Délicieux Than A Ding Dong
In honor of Canadian Thanksgiving, The Takeout is celebrating the nation's culinary contributions all week long. We hope you enjoy Canada Week.
Whenever I have a question about Canada, I text my good friend Amanda Cohen, head chef and owner of Dirt Candy and a certified Canadian. Then I proceed to ask at least 20 follow-up questions because I'm highly suspicious of our friends in the Great White North: Once I found out about sushi pizza and pink cream soda, I started to wonder what other tasty delights they've been keeping all to themselves. If I was going to develop a recipe for Canada Week, I wanted a deep cut—something as beloved to Canadians as hockey, health care, or John Candy.

Amidst my interrogation, Amanda came clean about Jos Louis: little round sponge cakes filled with vanilla cream and dipped in chocolate. The cake was invented by husband-and-wife team Joseph-Arcade Vachon and Rose-Anna Giroux, who opened a small bakery in Quebec in the 1920s and named their signature snack cake after their sons, Jos and Louis. Vachon eventually grew to be one of the biggest baked good brands in Canada, and the packaged Jos Louis became the country's unofficial after-school snack.
All of my Canadian friends are quick to point out that Jos Louis is not the same thing as a Ding Dong, nor a Ring Ding, because (just as I suspected) America can't hope to compete with the quality of Canada's snack cake output. The Jos Louis is sweet without being too sweet, with moister, thinner, "red velvet" cake layers. I use the quotation marks there because traditionally, red velvet cake got its color from a chemical reaction involving buttermilk and cocoa powder; over time recipes began adding a bit of red coloring for aesthetic purposes, and today, I've seen more than a few red velvet recipes that are pretty much white cake with food dye.
For ease of preparation, rather than making the cakes into perfect circles, I chose to make the cake as one large rectangle, then cut it into individual Jos Louises. Though you really should be doing this with every recipe, I implore you to read this recipe all the way through at least twice before you start, not only because there are a few waiting periods in the process, but also because I want you to note what sort of kitchen equipment you'll need and when to use it. Dipping things in chocolate glaze has a tendency to get messy, especially if you, like me, tell one of your kids that they can help you in the kitchen without thinking things all the way through first. Expect to get chocolate all over your hands, and maybe some other parts of you, too. Don't stress about it.
Amanda also noted a commonality between our two great civilizations: We both like keeping our chocolate-coated snack cakes in the freezer, which somehow makes them more delicious. And that's what I've done with mine, not only for quality, but to make sure I'm not "forced" to eat 12 snack cakes in a single day. After I finish dipping the cakes I freeze them until solid, wrap each in a piece of wax paper, then stick them in a large ziptop freezer bag and keep them as cold as a mummified toe in the Yukon.

For the cake:
- 1 cup (2 sticks) butter, melted
- 1/2 cup light brown sugar, unpacked
- 1/2 cup granulated sugar
- 3/4 tsp. kosher salt
- 2 eggs
- 1/2 tsp. vanilla extract
- 1 cup buttermilk
- 1 2/3 cup flour
- 1/3 cup natural cocoa powder (not Dutch processed/alkalized)
- 1 tsp. baking soda
- 1 tsp. white vinegar
For the marshmallow filling:
- 5 egg whites
- 1 1/4 cup sugar
- 1 tsp. white vinegar
- 1/2 tsp. kosher salt
- 1/2 tsp. vanilla extract
- 4 Tbsp. (1/2 stick) butter, cut into small pieces
For the chocolate glaze:
- 400g (approx. 2 1/2 cups) semisweet chocolate chips or chopped chocolate
- 4 Tbsp. (1/2 stick) butter
- 1 Tbsp. light corn syrup or agave syrup
- 1/2 tsp. kosher salt
- 1 1/2 cups powdered sugar, sifted
- 1 tsp. vanilla extract
- 3/4 cup boiling water or coffee
Step One: Make the cake
Preheat the oven to 350 degrees Fahrenheit. Line a 9x13" baking pan with parchment paper or lightly greased aluminum foil, leaving enough overhang on all sides to help you move the cake around after baking.
In a large bowl, whisk together the melted butter, sugar, brown sugar, vanilla, and salt until well combined. Whisk in the eggs one at a time until smooth, then stir in the buttermilk. Sift in the flour and cocoa powder, and stir a few times until the batter just comes together. Add the teaspoon of baking soda to the middle of the bowl and dump the vinegar on top of it. As it fizzes, rapidly whisk the batter by hand for about 20 seconds, then pour into the prepared cake pan. Smooth the batter out to the edges, give it a few firm taps on the counter to help level it out, then slide onto the center rack of the oven and bake for 15-18 minutes until done.
Allow the cake to cool for 10 minutes, then grab the lining overhang and gently pull the cake straight out of the pan. Pop it into the freezer for at least 20 minutes to firm up.
Step Two: Make the marshmallow filling
Set up a double boiler using a saucepan filled with 1" of simmering water and a heatproof bowl. Add the egg whites, sugar, vinegar, and salt to the bowl and whisk vigorously until the mixture becomes a thick and glossy marshmallow frosting. Using a handheld mixer, this should take about 4-5 minutes; by hand, anywhere between 7-12, depending on how strong you are.
Remove the filling from the heat, add the butter and vanilla, and whisk vigorously until smooth. Set aside.
Step Three: Assembly
Remove the cake from the freezer and, using a long, thin serrated knife, slice it into two layers. Set the top layer aside, pick the cake up by the parchment/foil lining, and set it back into the pan. Gently press it down until you're sure it's touching the bottom of the pan, then smooth the lining around the sides of the pan the best you can.
Pour the marshmallow filling into the pan, using a spatula to get every last bit out of the bowl, and spread across the cake evenly. Once again, give the pan a few good whacks against the counter to level things out, then pop it in the freezer for about 5 minutes to set up a bit. Put the top cake layer back into the pan, gently pressing down onto the marshmallow filling, then return to the freezer to set until you're ready to glaze them. (Ideally it'll freeze for at least an hour, but if you're desperate for cake and just can't help yourself, try to hold out for at least 15 minutes.)
Step Four: Time to glaze
In a large microwave-safe bowl, melt the chocolate, butter, and corn syrup together by zapping in one-minute increments at 60% power, regularly stirring with a fork until smooth. Switch to a whisk, add the salt and powdered sugar, and stir vigorously until combined. Slowly stream in the boiling water while whisking constantly, then add the vanilla and whisk until smooth.
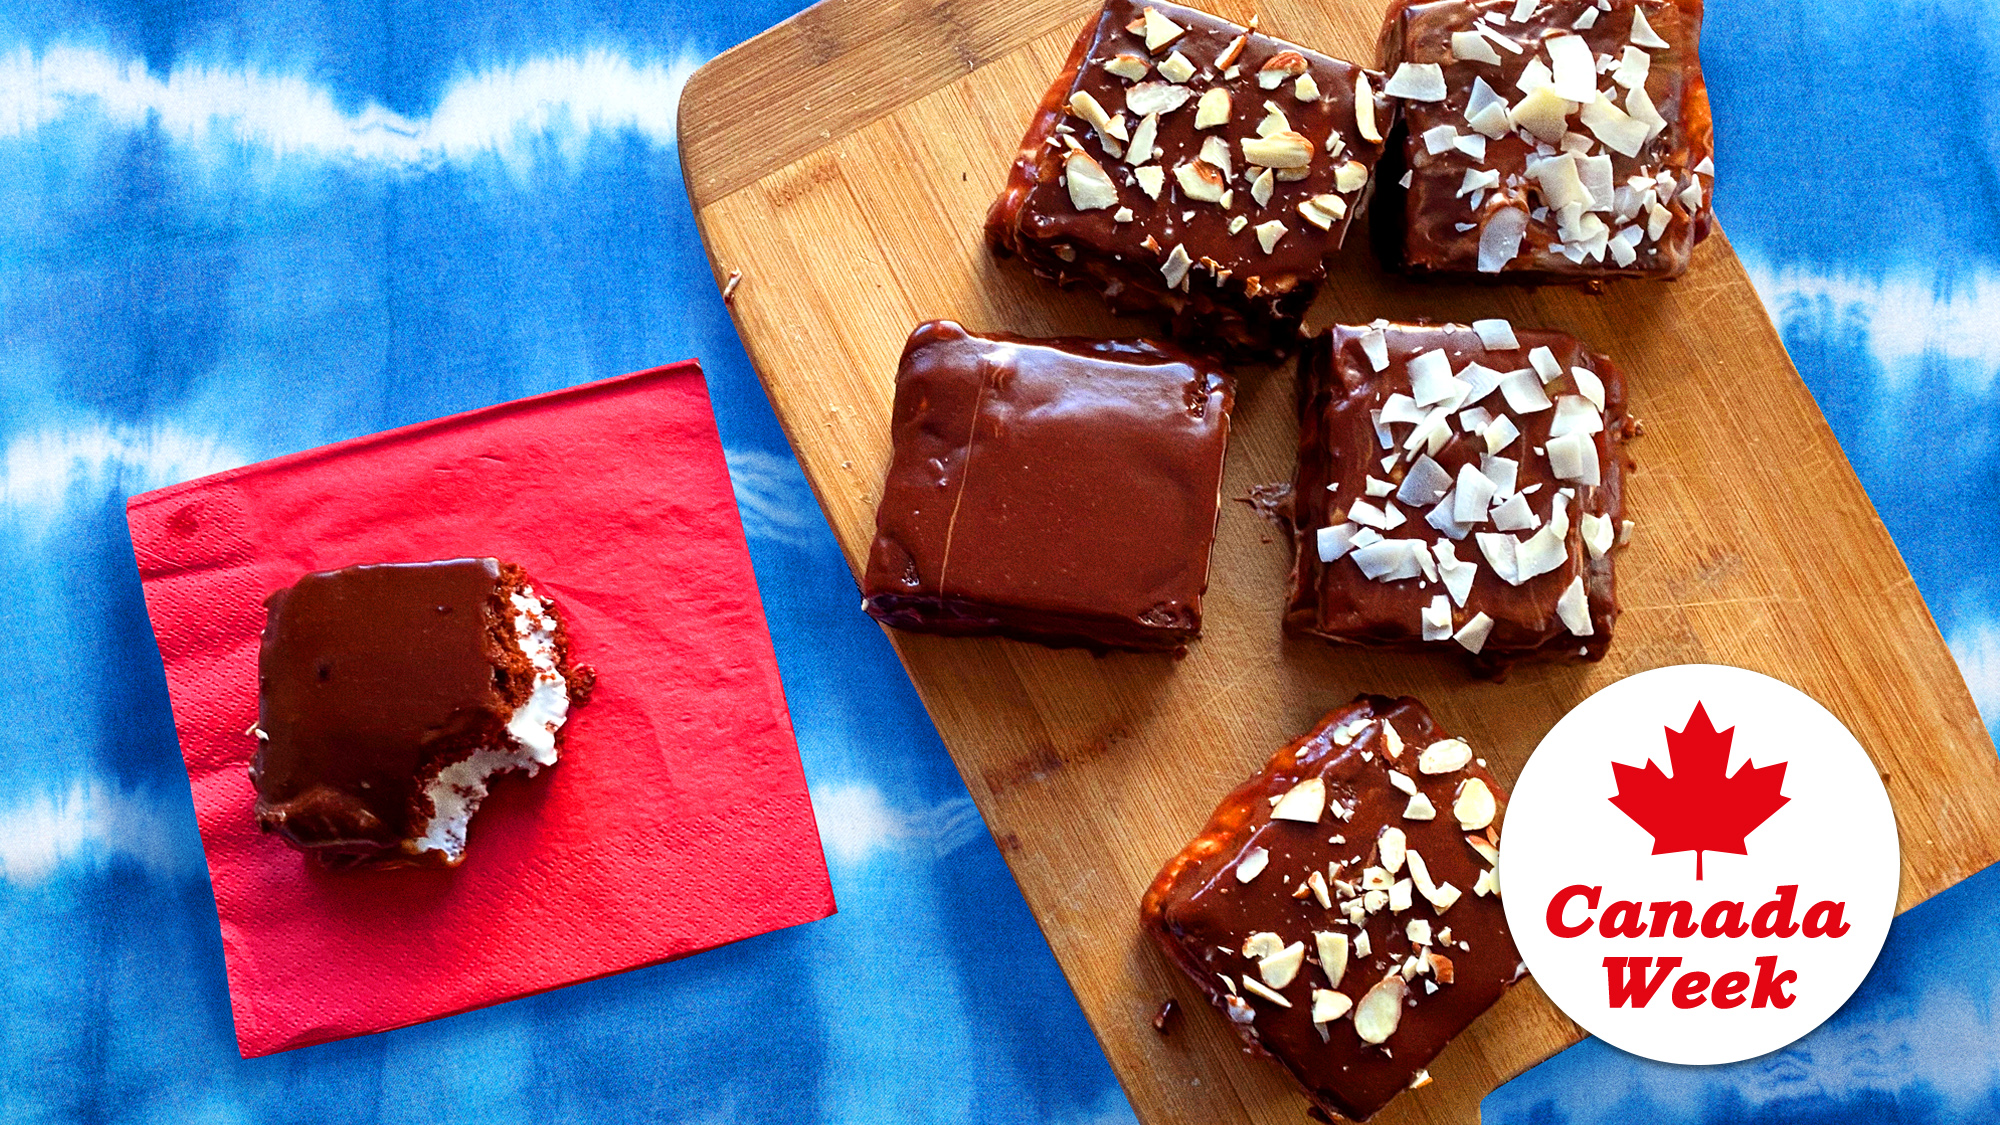
Set a cooling rack over a sheet pan or large cutting board. Whenever you're ready, once again lift the cake out of the pan, the use your serrated knife to cut it into any sized snack cakes you'd like. (I like cutting mine into 12 pieces, as pictured above.) Arrange on the cooling rack, leaving a few inches between each. (Set up a second sheet pan if necessary.)
If the glaze has hardened up and doesn't seem pourable (it should look like runny hot fudge), microwave it in 10-second increments until it loosens up. Move the bowl of glaze directly next to the cakes. Again: this can get messy, so don't worry too much about drips or dribbles or making everything look perfect.
Working quickly, dip all four sides of the cakes into the glaze, then let the excess drip off for a few seconds and put them back on the racks. Use a small teaspoon to pour glaze on top of each cake, spreading it out to the edges and letting it drip down the sides. (If you perchance find yourself with extra glaze, pop the cakes into the freezer to quickly harden, then give them a second coat for extra-glazey goodness.)
If you'd like to sprinkle anything fun on top of your Jos Louis cakes, do it while the glaze is still wet. How long it will take the glaze to harden depends on the temperature of your kitchen; if you'd like to speed things up, you can pop them in the fridge or freezer. Wrap each snack cake in wax paper, then serve immediately, or store in the freezer. (Can be eaten thawed or frozen.)