Brown Butter Cinnamon Rolls Take All Day, But Dear God Are They Worth It

My cinnamon rolls are a pain in the ass to make. They're worth it, but seriously, they're a pain in the ass. I first developed the recipe for my former bakery, where I'd only make two dozen on weekends and our best customers knew to be there at opening. It didn't seem such a chore when I was running a bakery, but then I try to make it at home and it feels totally excessive. I tried creating simpler version of this years ago, but it just didn't stack up to the original. I recently tried again to cut corners but for you, our beloved Takeout readers, it wasn't good enough. You guys deserve the best.
There will be some of you who are ready to hit me up with questions in the comments in hope that there must be some way to make these cinnamon rolls less work, as if I actually know this information and am just holding out on you. No. I've tried. If you want to use sourdough starter or make it gluten-free or for some unholy reason, add raisins, have at it.
But I beg you: Do not be dissuaded from trying this recipe because of the effort involved. Even if they don't come out right on your first try, failed cinnamon rolls are better than store-bought cinnamon rolls. You're either going to get big buttery buns with brown-striped spirals, or a sticky, partially raw pan of dough with streaks of cinnamon goo. The worst case scenario here still sounds awesome. Enjoy your mistakes—you'll do even better next time.
Brown Butter Cinnamon Rolls

It is incredibly important to read this recipe all the way through before you attempt it, and to measure out all your ingredients before you get to work. If you have a digital cooking scale, use it. If you don't, use the volume measurement conversions I did for you, and then go out and buy a scale. Every kitchen needs one.
Part A:
- 1/2 cup whole milk
- 1 packet active dry yeast
- 30 grams (1 Tablespoon plus 1 teaspoon) light corn syrup
- 125 grams (3/4 cup) all purpose flour
- 40 grams (1/4 cup, unpacked) light brown sugar
- 45 grams (2 Tablespoons) light corn syrup
- 350 grams (2 cups) all purpose flour
- 3 large eggs
- 2 grams (1/2 teaspoon) kosher salt
- 140 grams (10 Tablespoons) unsalted butter
- 1 stick (8 Tablespoons) unsalted butter, melted
- 3/4 cup light brown sugar
- 3/4 cup brown butter solids
- 2 teaspoons cinnamon
- 1 teaspoon kosher salt
Part B:
Part C:
Part D:
Step One: Make the poolish
Poolish is a yeasty pre-ferment that makes the dough into something pretty damn special. It's going to take a long time to do its thing, so start this at least 12-24 hours before you're hoping to actually eat the cinnamon rolls. If you want them on Saturday morning, start making the poolish before you leave for work on Friday.
Put the ingredients in Part A—the milk, yeast, corn syrup, and flour—into the bowl of a stand mixer, then stir it around with a spoon until they're all combined and goopy.
Next, pour Part B—brown sugar, then corn syrup, then flour—right on top of the poolish. Don't stir! Just dump them in, in that order, then cover the bowl with a loose sheet of plastic wrap or a kitchen towel, and stash the bowl somewhere that's not too hot, but not too cold (I like the top of the fridge). Leave it there for at least two hours, and up to 12 hours.
Step Two: Make the dough
Now it's finally time to gather all the ingredients from Part C, and whip out the stand mixer and the dough hook. First though, slice the butter into thin pats—about 1/16" each. Spread them around a bit on a plate so they can come to room temperature quickly; you want them to be pliable when you handle them, not melted. Crack the eggs into a measuring cup or small bowl, and add the salt.
Get the bowl of poolish and flour and fit it into your mixer. Start the mixer on medium and let it run for a minute or two until the flour and poolish seem somewhat mixed together. It's going to be very dry and crumbly. Stop the mixer and use a silicone spatula or wooden spoon to bring up any bits of the poolish that are stuck to the bottom, then set the mixer back on medium for another minute or so until the dough comes together somewhat.
With the mixer running, add an egg, count to 10, then add another egg. Repeat. Turn the mixer up to high for a minute, then stop it and scrape down the bottom and sides of the bowl. Hold onto the mixer to keep it from flying off the counter (it will try to do this), and beat the hell out of the dough on medium-high until it turns into a tough ball that wraps itself around the dough hook—about five minutes.
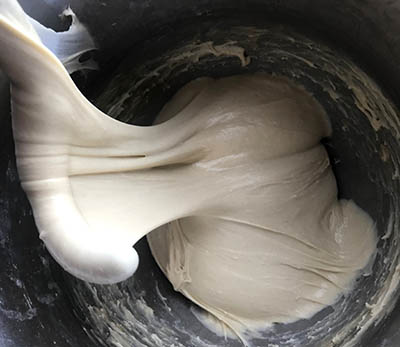
Next, you're going to add the butter to the dough bit by bit. Stop the mixer, grab a few pats of butter, and push them into the dough—if you just toss the butter in while the mixer is running, it'll just get flung onto the side of the bowl while the dough spins round and round. Smoosh a bit of butterin, then run the mixer on medium for about 20 seconds until you can't see the butter anymore. Stop, smoosh another five or six pats in there, and repeat. Keep doing this, making sure you scrape the sides of the bowl every so often, until all the butter has been added, then just keep mixing it until you get a nice glossy ball (see photo at right). Cover the bowl with a sheet of plastic wrap or a dish towel, then let it sit (proof) at room temperature for an hour.
After an hour, the dough will have risen significantly, and it will be smooth, silky, and also quite soft. It needs another two hours of rest, this time in the fridge, to help it firm up a bit. Use your spatula or dough scraper to scoop up the dough to deflate it, then return it back to the bowl, cover with plastic pop it into the fridge and set your timer for two hours.
Step Three: Roll your dough
You need to roll out your dough on a very well floured counter or wooden board, so I suggest filling a small bowl with flour off to the side to keep dipping into as needed. This dough is soft, stretchy, just a bit sticky, and feels so luxurious that you'll want to make a blanket out of it. Don't stress out as you roll it—just let yourself become one with the dough.
First rub a bit of flour on your board, your rolling pin, and your hands. Plop the dough out from the bowl, then knead and pat it around just a little bit so you get a nice rectangle. Roll it out a bit in one direction, then sprinkle the top with a wee bit of flour, lift up the dough, and flip it over. Giving it a flip each time you roll it out a little but to make sure it doesn't get stuck to the board, which is something you don't want to discover when it's time to roll. Keep rolling, stretching, and flipping the dough until you get an even rectangle that measures about 12" x 18". It's okay if it's not perfect.
Step Four: Time to make the cinnamon goo
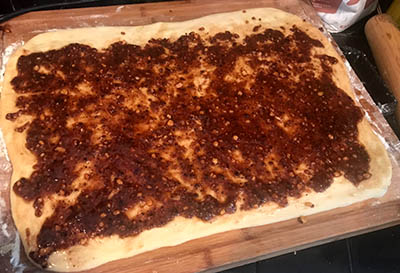
In a small bowl, mix everything in Part D well: the melted butter, brown sugar, brown butter solids, cinnamon, and salt. Taste the goo! If you want yours a little sweeter, add a bit more sugar. If you want it spicier, add more cinnamon. Pour onto the dough rectangle and spread out as well as you can—you can use a spatula if you want, but I find it best to do this with my bare hands. Pat it all the way out to the sides, leaving a bit of a lip up at the top (see right).
Next, slowly roll the dough up from the bottom—if anything breaks apart, just pinch it back together. One rolled up, smooth it with your hands until you get a nice, even log, then cut it into 12 even rolls. Grease a 9" x 13" casserole dish with butter, then put the rolls in the pan and cover with plastic.
Here is where the method can diverge into two routes:
- If you'd like to bake the rolls immediately, let them sit (proof) at room temperature for 30 minutes.
- If you'd like to bake them the next morning, pop them in the refrigerator and allow them to slow-proof overnight. Pull them out to come to room temperature as you preheat the oven the following day.
Either way, when the rolls are puffy and touching each other, they're finally ready to bake.
Step Five: Actually baking these damn cinnamon rolls
Preheat the oven to 350º Fahrenheit, then slide the rolls in for at least 35 minutes. Personally, I like my rolls a bit medium-rare (so to speak) in the middle, so at 35 minutes I pull them out and let them cool on the counter for another 10. If you like yours a bit more well done, bake them for 40.
At this point, you can just eat them. You can eat them hot right out of the pan, or cool them down for a bit before topping them with cream cheese glaze. If you want to break the rolls apart, wait 10 minutes before doing so.
Cream Cheese Glaze
- 6oz (3/4 block) cream cheese
- 3/4 cup powdered sugar
- 3-5 Tablespoons whole milk
Soften the cream cheese in a bowl by microwaving it in 15 second increments, stirring in between until it's like thick, melted ice cream. Beat in the powdered sugar with a fork, then stir in the milk a tablespoon at a time until the glaze is as thick as you'd like it.
Glaze the cinnamon rolls and enjoy. You've certainly earned them.
Footnotes
As you may have guessed, the most important part of this recipe is the dough, and that's where you need to follow the instructions down to the letter. When it comes to the filling or the glaze, let your freak flag fly. You can add ginger and nutmeg to the goo, or replace the goo entirely with something like Nutella, or perhaps a thick schmear of apple butter with some chopped toasted walnuts.You could even go savory with it, maybe with some pesto and lots of shredded cheese. Once you've got the basic skills down, you can have a little fun with this. If you do, let me know what you did in the comments. The recipe means a lot to me, and I want you to do well with it. Hopefully you can start your own traditions with these cinnamon rolls, and it'll be a recipe that means a lot to you, too.