13 Ways To Use A Culinary Torch That Go Beyond Crème Brûlée
We may receive a commission on purchases made from links.
Using a culinary torch may seem intimidating, and to some, may even seem like an unnecessary purchase. Since most people only associate its use with the preparation of crème brûlée, owning a culinary torch might seem virtually useless for anything else — until you come to realize its many uses, that is.
Though certainly handy for crème brûlée, there are so many other ways to utilize a blow torch in your kitchen. From imparting smoky flavor to your favorite entrées to adding a delightful char to sweet treats, there are several unexpected yet totally practical uses for a kitchen blow torch.
Before we delve into all of the fun ways to use a culinary torch at home, we'd like to take a moment to stress the importance of using a torch safely. As you read, be sure to make note of any safety precautions mentioned, and always have a plan of action in case a fire were to break out. With that out of the way, settle in and get cozy — we're revealing ways you can use a culinary torch to add a delectable sizzle to your next dish.
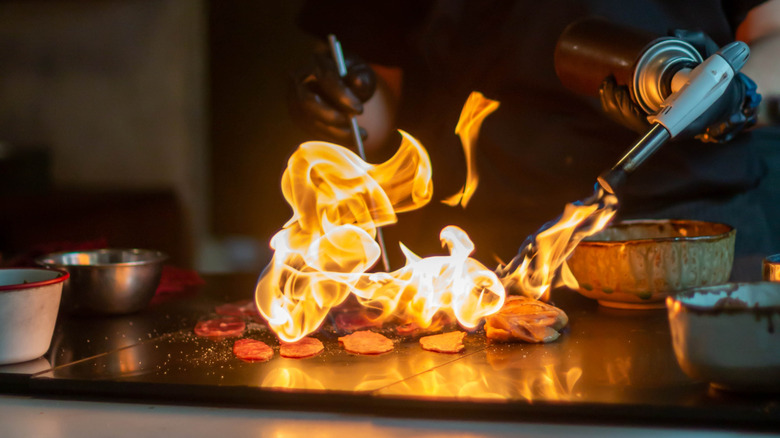
Charring meat
Whether you're cooking a thick steak sous vide or simply are looking to add a little extra color to your meat, using a culinary torch is a great way to add a bit of char. In the case of steak, you may notice that the inside has reached the desired temperature, but the outside failed to brown. In this case, you can turn to your culinary torch to brown your steak. When doing so, hold your blowtorch about 6 inches away from the beef and be sure to move it constantly to prevent burns.
Though using a culinary torch is a great way to sear steak, the fun doesn't stop there. You can use a blow torch at home to add extra color or charring to other kinds of meat, including poultry. The key when torching is to be mindful of the distance between the flame and your piece of meat. If torching chicken, for example, consider holding your culinary torch as much as one foot above your meat, carefully guiding the flame in one stroke across the surface of the chicken before returning to where you started. Keep doing this until you achieve the level of color you wish to see. Of course, the closer you place the flame to the meat, the more char you'll get.
Lastly, be sure to do this over a safe surface. A large cast iron skillet or baking sheet are wonderful options to use when charring meat with a kitchen torch.
Meringue
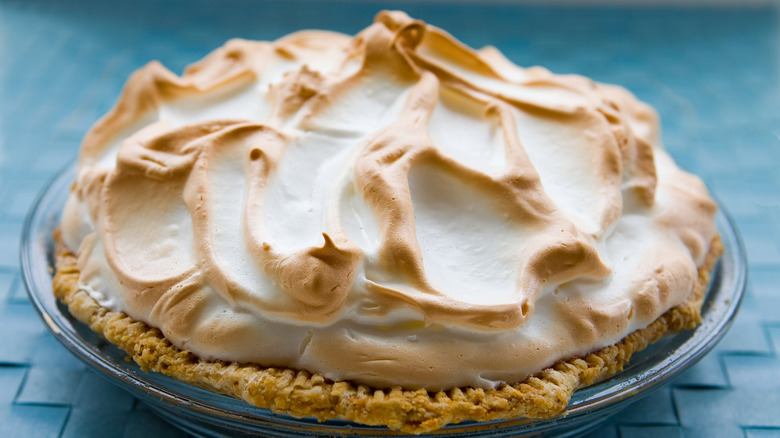
If you want a beautifully golden top on your meringue but don't necessarily want to fire up the oven, it might be time to make use of your culinary torch. Traditionally speaking, meringue gets its brown-top color from an oven or broiler. You can use either strategy; however, using a blow torch can be just as efficient, especially considering that you have more control over the torch, allowing you to hit your meringue at all sides and angles for gorgeous browning around every nook and crevice.
When using a culinary torch to brown the top of your meringue, start with a small flame. Hold the torch over your meringue, taking care not to get too close. Move your kitchen torch back and forth until you reach the preferred level of golden color. Be sure to keep your torch moving and active — staying stagnant, especially given the delicacy of this dish, can lead to burnt results.
Melting cheese and butter
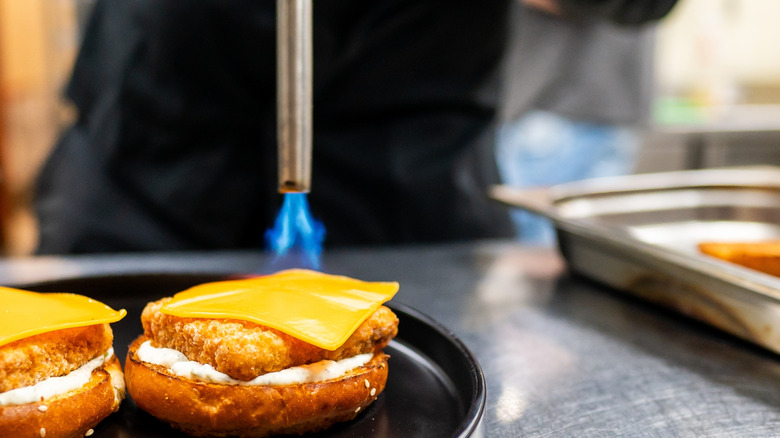
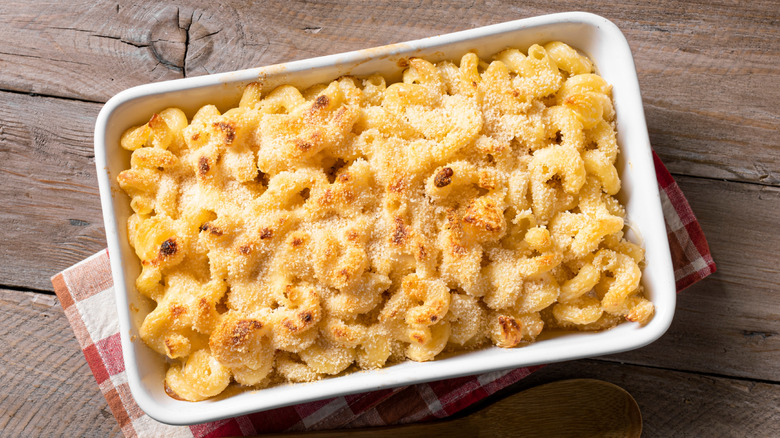
Among the many beneficial uses for a culinary torch comes the mundane task of melting cheese and butter. Though either could be done relatively quickly in the oven or microwave, having a kitchen torch on hand, even an inexpensive one like this TBTEEK Butane Torch on Amazon, can serve as an even more convenient melting method that offers you plenty of control. For instance, it comes in handy when you want to add a rustic brown crispiness to the top of your mac and cheese but don't necessarily want to bake the whole thing, especially if it's already been cooked oven stovetop. A small torch would also work well for the purpose of quickly applying heat to a slice of cheese on your lunch-time sandwich or adding rich golden color to whichever is your go-to cheese for topping French onion soup. Simply sprinkle on your cheese and blow torch until your cheese takes on a rich new hue.
As for melting butter, if you're using a blow torch for the task, it shouldn't take long. Just a few wafts of the torch and the butter should melt. We've seen people hold a stick of butter over a dish before passing a culinary torch over it, instantly melting the butter to be drizzled over the top. And while it might seem a little "extra" to some, melting butter or cheese using a culinary torch is yet another resourceful way to use this versatile tool.
Blistering tomatoes
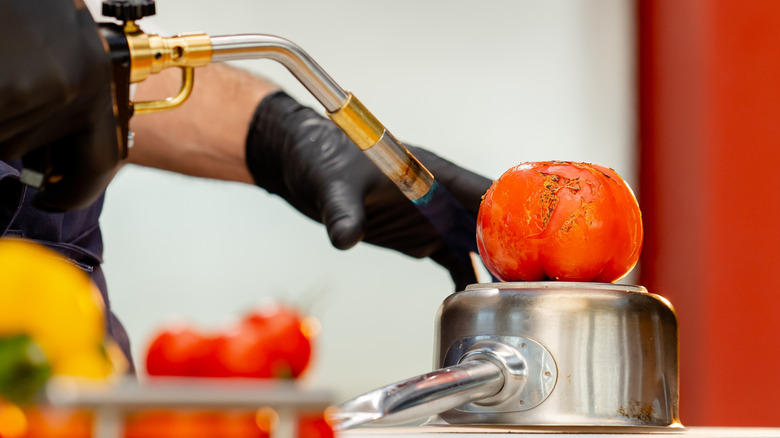
For ultra-smooth sauces, stews, and salsas, it's a good idea to remove the peels from tomatoes. Aside from blanching your tomatoes before you peel them, you can also use a culinary torch to skin tomatoes the easy way. To start, use a knife to mark the bottom of your tomato with an "X." This is where you'll begin peeling once your tomatoes have been torched. From there, use long metal tongs like these affordable Walfos 17-inch Grill Tongs to hold the tomato still as you carefully guide the flame over the skins.
Once the tomato has been scorched, run it under cold water. Starting where you previously scored the tomato, peel back the skin until all have been removed. The heat from the flame should have dried out the skin, making it much easier to remove.
You can also use your culinary torch to add smoky flavor to your tomatoes. To do it, run the flame of the torch over the tomatoes you'd like to use (with or without skin) before throwing them in whatever dish you please. We'd recommend trying this method with tomatoes you intend to use in chili or homemade salsa, as the smoky flavor will likely complement the ingredients in your dish.
Roasting peppers

If you want the flavor of blackened peppers without needing to oven-roast them, using a culinary torch can get the job done. There are a variety of peppers that can benefit from charring, including habanero, poblano, and jalapeño peppers. Still, certain peppers might require you to follow specific protocols when blanketing the skins with a torch, so be sure you know which strategies you should use before you get started.
When torching thin-skinned peppers, you'll need to be careful not to burn them. To accomplish this, try dousing the peppers with salt water before charring. For other pepper types, you can skip the salt solution and immediately place your peppers on a fireproof surface such as a wire rack or baking sheet. Gently brush the torch flame back and forth over your peppers until they become blackened, making sure to rotate the peppers to ensure all sides are charred. Use tongs to place the blackened peppers into a bowl of cold water (or in an empty bowl with a lid, such as these Pyrex Sculpted Glass Mixing Bowls, to help trap steam) for 10 to 15 minutes. Remove the peppers from the water, peel the skins, and use your smokey torched peppers in the dish of your desire. You can even keep the skins intact if you plan to use your charred peppers for stuffed peppers — delish.
Toasting marshmallows
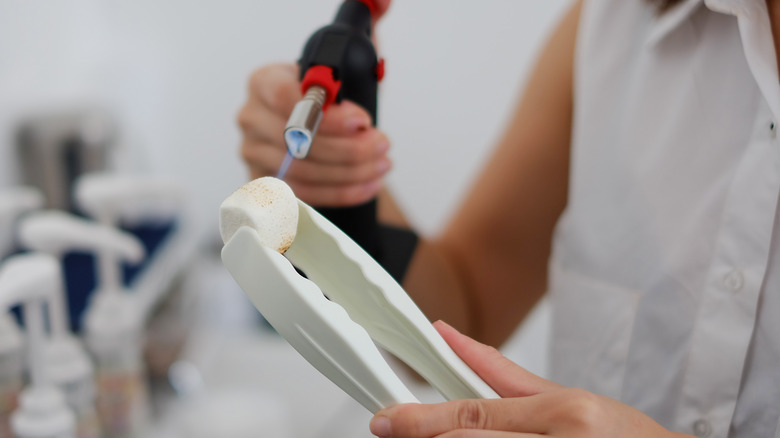
Craving s'mores in the dead of winter? No problem. Fire up your culinary torch and enjoy the flavor of toasted marshmallows right from the comfort of your warm kitchen. While it's totally possible to toast them indoors with an oven, using a blow torch is a conveniently fun way to tackle the task, especially for impromptu s'mores making. But don't feel like you have to stop at s'mores when it comes to torching marshmallows; use your charred marshmallows to make edible shot glasses or enjoy them plain for an easy and simple late-night snack when your hankerings kick in.
To torch marshmallows, either grab those tongs we mentioned earlier or lay your marshmallows on a fireproof surface. Gently pass the flame from your blow torch over your marshmallows and watch as their white hue turns from pale to golden in seconds. Just be aware that the golden hue you see can quickly turn to black if you aren't cautious — in fact, some marshmallows may even catch fire. Take care not to hover in one area too long, and accept a little char on your marshmallows as a part of the experience. You should end up with toasted marshmallows that pair beautifully with chocolate, graham crackers, fruit, or whatever else your tastebuds are yearning for.
Toasting breadcrumbs
If you've already got a dish cooked up and would like to add a few breadcrumbs over the top, why not hit it with a culinary torch to give it some color? While traditional breadcrumb toppings get their golden color from basking in the warmth of the oven, firing up this appliance isn't necessary, provided that the base of your entrée is already cooked. Simply top your desired dish with breadcrumbs and gently sweep your torch flame over the surface to achieve a crisp texture and deliciously browned top.
As previously mentioned, you won't necessarily want to use a blow torch for browning breadcrumbs for a dish that already needs time in the oven. Breadcrumb toppings (or other toasted breadcrumb recipes) typically brown well using this cooking method. Having said that, if your breadcrumbs have spent time in the oven but still don't yield the color you'd like to see, this is a great time to put your torch to use.
Caramelizing fruit
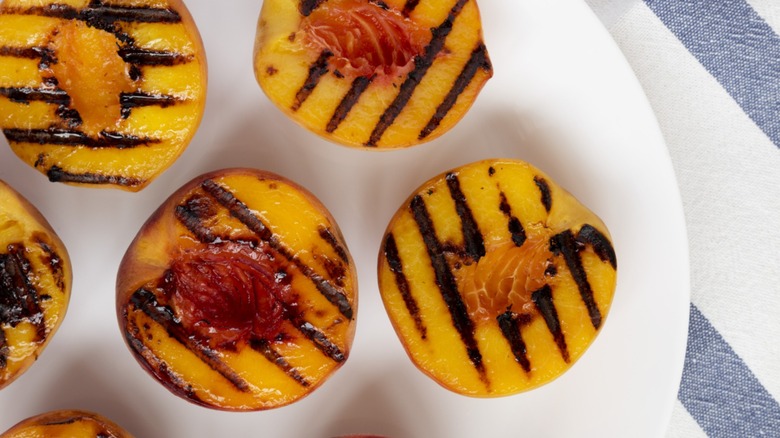
One of the best ways to employ a culinary torch in the kitchen is to use it to caramelize fruits. There are several types of fruits you could do this with, from pineapple to peaches and even bananas for banana split ice cream.
To get started, you'll want to have sugar on hand; this is what gives your torched fruit that rich caramelized flavor. Cover the surface of your fruit with sugar before lighting your torch. As always, you'll want to light your torch away from your fruit first (pointed in a safe direction, away from anything that could potentially catch fire) before slowly guiding it back and forth over the sugared fruit's surface. Aim the torch a little further away for even browning and a light caramel coating over the top. For intensely caramel flavor (and a bit of bitter flavor as well) bring your flame closer.
If you're new at this, be sure to have plenty of fruit on hand in case you burn it on your first go. It takes a little while, but the benefits of knowing how to do it correctly are worth it. The results are a perfectly crispy, sweet, and crunchy brûlée topping, taking the sweetness of natural fruit up and over the top.
Adding flavor to stir fry
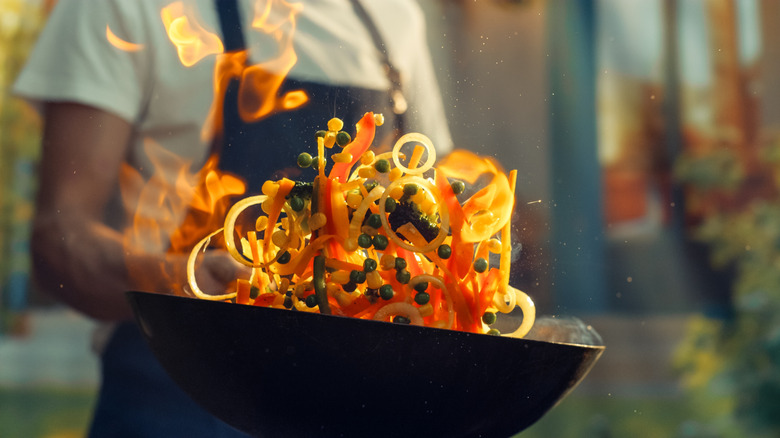
Looking to add Cantonese wok hei flavor to your stir fry from home? It's totally achievable, even without a commercial-grade cooking range. Instead, rely on your kitchen blow torch to add smoky flavor for you by passing your torch over the stir fry after it's finished cooking. You only need to wave your flame over your stir-fried entrée for about 20 to 30 seconds and can do so directly in your wok or cast iron skillet.
Be aware that you'll sometimes get flames that lick up into the air from the wok or skillet when torching stir-fried meats and veggies. Because of this, safety will be paramount. Have a fire extinguisher nearby in case things get out of hand, and always waft your flame over your food and not necessarily directly on it, particularly in the case of stir fry. Experiment and stay safe; remember that a lid usually works to snuff out flames, as well.
Charred corn
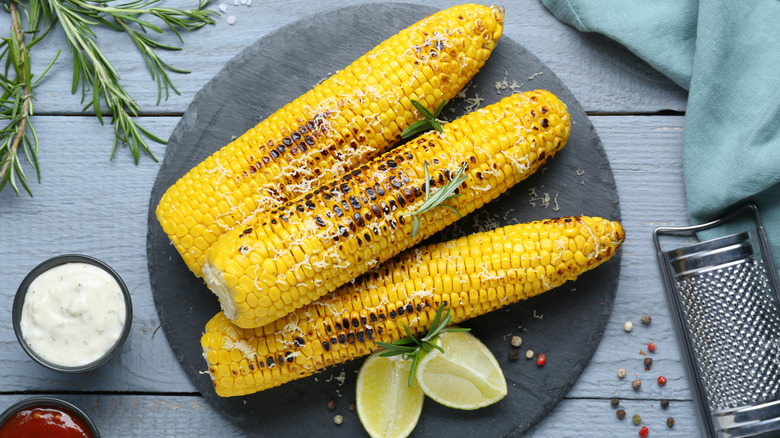
In need of charred corn for salsa, salad, or to enjoy on its own? If so, give a culinary torch a try. Charring corn using a culinary torch can be accomplished in much the same way as roasting tomatoes or peppers and makes for beautiful coloring over its pale yellow kernels. Once charred, you can shave the corn kernels to pop into your favorite dish or keep the corn on the cob to enjoy as is.
Before torching fresh corn, you'll need to cook it. Place your corn cobs in a pot of hot water and boil for about three to five minutes. Remove your corn with tongs, dry it to remove any excess water, and place on a plate. Using tongs, hold your corn in the air and graze it with the flame of your torch so that you begin to char all sides. Once charring is complete, feel free to roll your corn in butter and fun seasonings (we like The Spice Lab Mexican Street Corn Seasoning) before enjoying. Some even like to give the corn one more pass with the blow torch at this point, which can provide more color and smokiness just prior to digging in.
Crisping tortillas
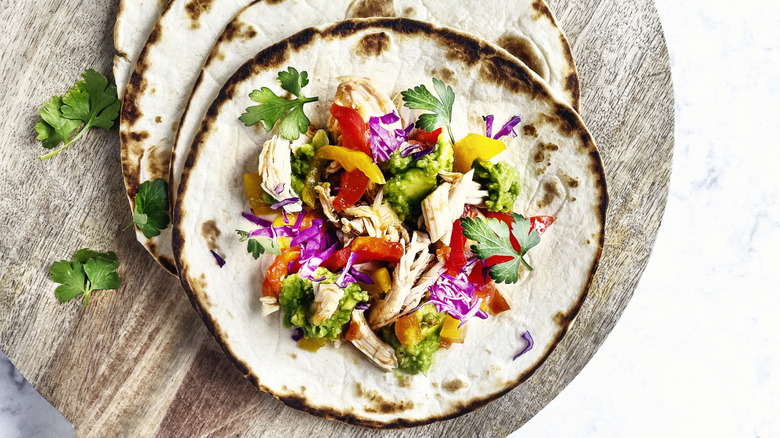
Some people find that placing tortillas directly over a gas stove burner produces warm and slightly blackened tortillas that taste incredible against the spicy and decadent flavors of Latin fare. And while standing over your stovetop to accomplish this is easy enough, it's even easier to crisp up tortillas using a blow torch, especially if there are a lot of them.
To pull it off, lay your tortillas flat on a rimmed baking sheet, fire up your torch, and have at it. You'll want to slowly waft your flame over the tortillas until even color is produced over each shell. Some tortillas may begin to bubble a bit; this is fine, though it's also a good sign that the shells are about done. Once you've achieved your desired level of golden color, move on to the next tortilla. The process should be relatively quick and painless, and you can keep shells warm by stacking them on top of one another or covering them with foil before popping them into an oven heated at 170 F. Serve them as the foundation for tacos or steak fajitas for a scrumptiously smoky meal.
Crisping up baked potatoes
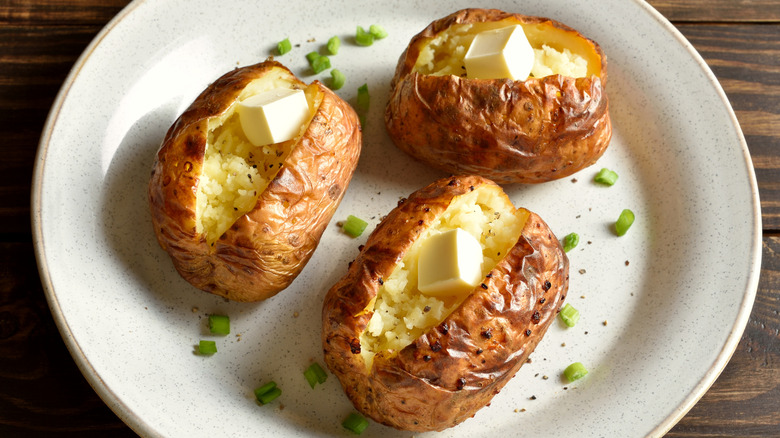
Ever microwave a potato? If so, you already know that it doesn't quite yield that crispy outer skin texture that baked potatoes usually get from cooking in the oven. No worries, though; that's what a blow torch is for. Use a culinary torch to get your spud's skin extra crispy, no oven needed.
To do it, simply cook your baked potato in the microwave as you normally would before placing it on a fire-safe surface. Break out your culinary torch and zap your spud, using back-and-forth motions until your baked potato's skins become as crispy as you'd like. From there, add your toppings and enjoy. If you need to, pop your spud back into the microwave for an extra minute or two, especially if you added cheese and it's struggling to melt. You could even brown the cheese using your blow torch if you wish; just be sure to only torch toppings you want browned or charred.
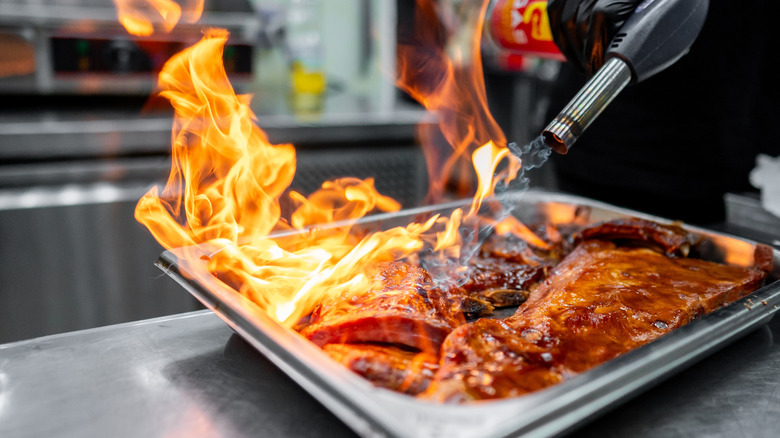
Adding char to glazed ham
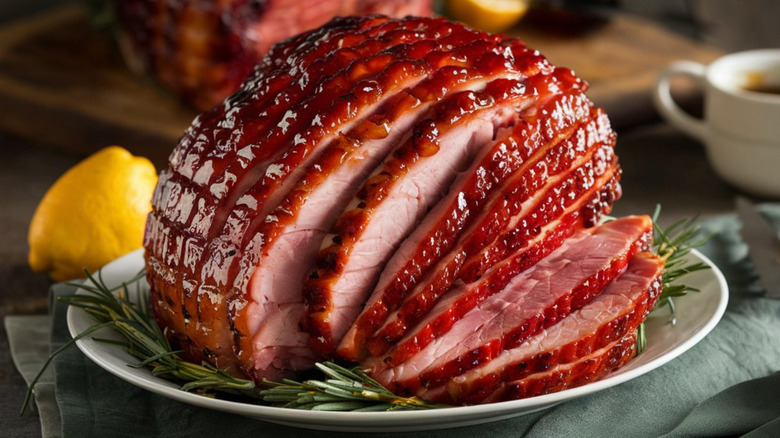
Torching a glazed ham will give you a beautifully charred exterior without overcooking it in the oven, which often results in tough and dry meat. Thankfully, torching your ham, like most things on this list, is very easy, making it a practical and oh-so-delicious way to give your holiday ham a lift.
To torch a glazed ham, you only need to cook your ham the way you normally would, usually in an oven for anywhere between 10 to 24 minutes per pound at 325 F, depending on the size of your ham. Prepare a brown sugar mixture to top your ham with and smear it over the top. Place your ham on a fireproof surface and use your culinary torch to evenly brown the outside of your ham all the way around. Though tempting, try not to use your finger to taste the sugary coating right after torching because you'll undoubtedly be met with a fiery and painful surprise across your tongue. Do yourself a favor and wait until your ham cools completely (glaze and all) before taste-testing.